I'm addicted. Or should I say, I'm stuck? I will admit it. I'm not ashamed. I've gone crazy over duct tape.
After I made that bag on Sunday, I decided I should try my hand at weaving duct tape. I remembered reading this post over on Jenny's blog. By accident, I ended up making my entire bag with one huge piece of duct tape "fabric", and I came up with this:
Cute, huh? Well, I couldn't possibly stop there. I had promised my 6-year-old daughter that bag was for her. But...
Don't you think it would look better on me?
So, I started again. This time, I measured first. And after posting some photos on Facebook and getting lots of requests for instructions, I decided to photograph the process.
Here goes: My first duct tape handbag tutorial. I'm sure it won't be the last.
1. Select the color of tape you would like for the inside of the bag. Stick your strips of duct tape directly on the table. The edge of each new strip should overlap the previous strip.

2. Select the main color you would like for the outside of the bag. You will make another set of strips the same length as those for the inside. However, this time, you want to lay the strips right next to each other without overlapping the edges.

3. Now you are going to take coordinating colors and weave them through the first set of strips. Just pull the tape back and lay a new piece of tape down perpendicular to the first set of strips.
 4. Continue doing this until you have weaved a full piece of duct tape.
5. You are going to pull the first piece of fabric — the one for the inside — off the table and lay it down sticky side up.
6. Now, pull the second piece of duct tape fabric off the table.
7. Hold it in a U shape so the sticky side doesn't stick to itself. I learned that if duct tape gets stuck to the OUTSIDE of duct tape, it is super easy to remove. However, if the two sticky sides get stuck, you will NEVER get them apart. (I mean never, as in... not in a million years with even the strongest two people on the planet pulling in opposite directions.)
 8. When you have the second piece of duct tape fabric in place over the first piece, lay it down and try to smooth out the wrinkles. Once it's in place, that's it. No turning back. So, just do your best and take deep breaths.
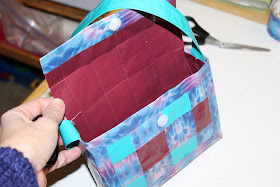
 10. OK. This is where I got fancy. I folded my piece of duct tape "fabric" so the bag had a bottom, sides and a flap. I can't really explain how I did this. And it kind of depends on how large you want your bag to be. If you look at Jenny's tutorial, she explains another way to do it where you make separate pieces of duct tape fabric for the back, front and sides.
 12. Next, just tape up the sides and tape some trim around the top. The great thing about duct tape is that if you make a mistake, you can just tape over it. And if you don't like something, it's pretty easy to pull off and start over.
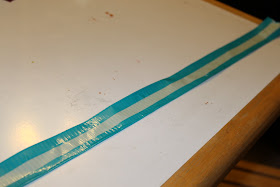
 13. After that, I made the strap. Just tear off a really long piece of tape and fold it in on itself. Then tear off another piece of tape and stick it over the top, folding again around the back of the first piece of tape. Does that make sense?
14. Use tape to stick on the strap from the inside.

14. I added a little piece of velcro to close it, and DONE! I would say the whole project only took me about an hour!

Now, if you'll excuse me... I need to go make a duct tape cellphone purse.


Very helpful. Oh my. I am not sure I am ready for such creativity!
ReplyDeleteIt's Very creative and lovely.I want to make one for me!designer wallets Regards.
ReplyDeleteCool but it sounds hard. I'm not sure I can do it. It seems WAY to confusing.
ReplyDelete